|


CLEO Launch
CLEO Message
Status Screen
Manager Control
Scan Coordinator
Antenna
Servo Monitor
Accelerometers
Motor Rack
Prime Focus 1 Rcvr
Prime Focus 2 Rcvr
1-2 GHz Receiver
2-3 GHz Receiver
4-6 GHz Receiver
8-10 GHz Receiver
12-18 GHz Receiver
18-26 GHz Receiver
I.F. Manager
L.O. 1 Rack
I.F. Rack
Converter Rack
Analog Filter Rack
Switch Sig. Selector
DCR
Spectrometer
Spectral Processor
Holography Backend
VLBI-DAS
Weather Station
Tipper
Archivist
Site Timing
Device Explorer
Sound Server
ActuatorCal
Analyze Messages
Save / Load All
CLEO Clock
Gateway
Scheduler
Sticky Notes
LST Appointment Manager
VNC Tool
TkCon Console
| |
Introduction:
CLEO Messages is an application that receives all incoming messages from
M&C Control regarding the events that are continuously being
monitored. These events may occur due to any number of reasons or
combinations of errors or information. Some of these events might be as harmless as some incoming
information about a Manager being on source or as Fatal as a message regarding a
Device that is not responding to its Manager. All of these types of
message, as well as anything in between, need to be constantly monitored.
To try to make sense of the data that is constantly coming in, an attempt to
make a user friendly application to display this data was made. We call
this CLEO Messages. CLEO Messages is a way of
organizing all of the data being received and displaying it in a user friendly
application. Many of the aspects about this application are dynamic and
can be specified and changed by the user, over and over again. Others cannot be changed due to their
being color coordinated for meaning and clarity. There are
different icons, row colors, tab names and colors, width of columns, etc.
This application has the ability to create up to ten tabs with user specified
names, descriptions, and foreground colors for the tabs, delete any number of
tabs after you have created them, to have multiple tabs that can be viewed at
one time, copies of messages going to different tabs for different reasons,
hiding and resizable columns, extended text, sorting, filtering, drag 'n drop,
users input as to suggestions for any changes, as well as many more enhancements
that can, and hopefully will, be used. I hope you enjoy the application
and that it enhances the readability of the incoming data and makes it more
understandable to the common user.
Main Display
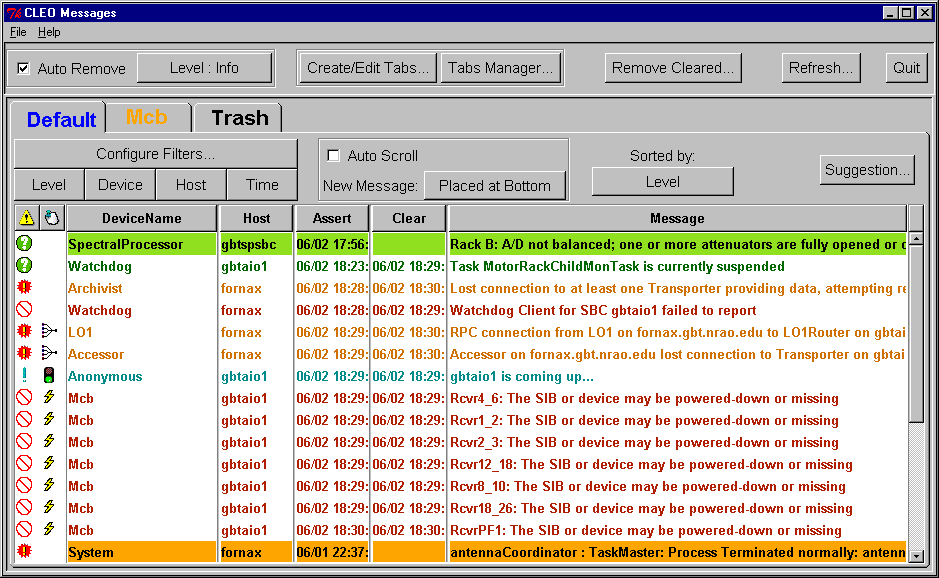
Concepts:
- Drag and Drop:
Drag 'n Drop is a process used to assign a permanent move or copy of certain
Devices, Managers, or Messages to a particular tab. The Drag 'n Drop
is used on both the main display and on Tabs Manager. In either case,
the Drag is initiated with a left hold of the mouse, Drag to the appropriate
tab or tab name, and drop the message by Device, Manager, or Message.
If you choose to copy the message to a tab by Device, all messages that come
in for that particular Device.
Logging:
Logging is basically a way of keeping a history of messages that are suggested
to be grouped together for some particular reason.
Message Types:
Messages come under five different types:
-
Assert - A message as it is originally received. Usually waiting to be
cleared.
-
Clear - A message that has been asserted previously and gets cleared.
-
sysUp - A message informing that a system is going up.
-
sysDown - A message informing that a system has gone down.
-
Transient - A message of an event that has happened. Does not wait for a
clear.
-
Multiple Tabs:
Multiple tabs are useful for viewing more than one message table at a
time. These tables can contain specific Devices, Managers, Messages, or
any combination of the above. The maximum number of tabs that can be
created at this time is ten. Although small, all ten tabs can be viewed at
the same time if needed.
Resizable columns:
Columns can be resized by using the mouse to do a left hold on the column
separator and moving the mouse left or right. The columns on either side
of the separator will shrink or grow respectively.
CLEO Messages Start Up Window
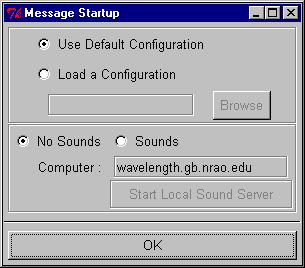
When Cleo Message is started, the first screen will be the Configuration and
sounds screen. Here is where you can choose to load a configuration by
checking the check button. You can then either type in the file name or
browse for the file name. To have sounds, you must again check the check
button and can specify what computer you the sounds to come out of. After
clicking OK, the changes will take place and the main display will come up.
Main Display
- Tear-off Tabs:
- Right-single-click on a tab label will tear off any number of
tabs the user chooses. There can be as many tear off tabs as needed.
To put the tab back, either right-single-click on the tab label again, or close
the tab using the "X".
-
- Drag 'n Drop:
- Left-single-hold over first column of icons. This will
result in the picking up, or drag, of a message. To drop the message, move
the mouse over another tab label and let go.
-
- More Info Popup:
- Right-double-click on a row. This will bring up all
information we currently know about the message in this row.
-
- Sort or Hide/Show:
- Right-single-click on a column label heading will bring up a
menu containing the option to Sort or to Hide/Show a column.
- Sort - Increasing or Decreasing by column that was chosen.
- Hide/Show - Hides the chosen column, or shows individual or all columns that
have been hidden. For obvious reasons, you can show any hidden column by
choosing any column label or heading.
- Highlighting:
- Selections of rows are made by:
-
single-left-click = single row selection of one only.
- ctrl-single-left-click = individual row selections of one or more rows.
- shift-single-left-click = all rows between first and last selection.
-
- Resize Column:
- Left-hold on column separator and move the mouse left and
right. This will resize the columns on either side of the column
separator.
-
- Extend Text:
- When the mouse is stationary over a text window, and the text is
longer than the window itself, the text will be displayed on a popup extension
over top of the original text. This extension has word wrap so none of the
text of the message will be lost.
Menu Bar
File Menu
 Save Configuration:
-
Save Configuration will bring up a separate popup screen to save the current
configuration to a user specified file. This will enable the user to
retain all specifications that he/she has made regarding filters, tabs, devices,
etc.
- Load Configuration:
Load Configuration will also bring up a separate popup screen, but this time it
will give choices for loading a configuration from a previously saved file
containing your specifications.
- Save/Print Tab
Save/Print Tab is a menu button that will display all of the tabs that are
currently created, as well as an "All" label. You may choose an
individual tab or all of the tabs to save or print their current information.
- Quit
Quit is just another way of exiting the program.
Help Menu
The Help selection on the menu bar is the same as most of the other CLEO
applications, so it will not be explained here.
Common Tool Bar

Auto Remove:
-
The Auto Remove button will automatically remove messages that have been cleared
if they are of the level and of the type that you have specified under the
Levels button. Auto Remove can be turned on or off by selecting the check
box.
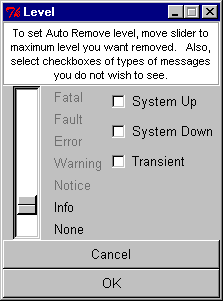 Level: Level:
-
The level button controls which messages will be displayed and which messages
will be removed when they are cleared. This button has two basic
functions, to set the levels and to set the types of these messages. The
level is controlled by the slider. As the slider is moved up, the level
that will be removed when the messages are cleared moves up. If the level
is highlighted, all levels from that point down will be removed. The type
is controlled by check boxes. If these boxes are checked, they will not be
displayed when they have been cleared, the entire row will just be
removed. For these changes to actually take place the user must press the
OK button.
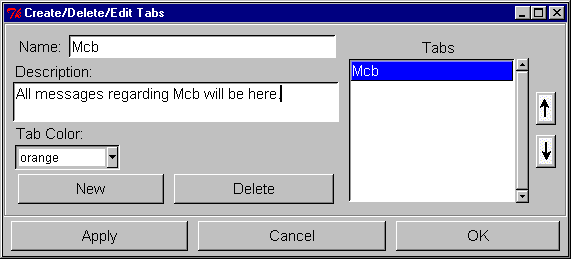
Create/Delete/Edit Tabs
The Create/Delete/Edit Tabs button brings up a popup window that allows the user
to create their own tabs with their own characteristics, delete current tabs,
and change existing tabs. All tabs are subject to these changes except the
default tab. The default tab is always created, and cannot be deleted,
changed, or moved, so it does not appear on this screen.
-
Name:
-
- Name is an entry field for a user specified name for a chosen tab. There
is no restriction on the number or on the type of characters used in the name.
-
- Description:
-
-
Description is a text box for a user specified description for a chosen
tab. Again, no restrictions on the number or the type of characters used
for the description.
-
- Tab Color:
-
-
Tab Color is a menu button containing a selection of colors for the user to
choose from for a chosen tab. The user is restricted to choosing from the
menu instead of entering their own color.
-
-
New:
-
- New creates new tabs with default values it can use until the user
changes them. There is a maximum of 10 tabs in this application, but this
can be changed if needed.
-
-
Delete:
-
- Delete must have a selection from the Tabs list box so it knows what tab
to delete. When deleting a tab, a notice will come up asking if you are
sure you want to delete this tab.
-
-
Tabs:
-
- The Tabs list box that contains the names of all of the tabs, except the default
tab. These names are in order of the tabs appearing in the notebook.
When a tab's name has been changed, it will appear in this list box under the
new name. To see what the other attributes about a particular tab are, you
can make a selection in the Tabs list box and the name, description, and color
will appear in their appropriate entries.
-
-
Up Arrow:
-
-
Up Arrow moves the selected tab up the list of tabs closer to the default
tab.
-
-
Down Arrow:
-
-
Down Arrow moves the selected tab down the list of tabs away from the
default tab.
-
-
Apply:
-
-
Apply accepts and makes all changes, but will not destroy the popup window.
-
-
Cancel:
-
-
Cancel will not accept or make any changes and will return to the main screen
after destroying the popup window.
-
-
OK:
-
-
OK will accept and make all changes and will return to the main window after
destroying the popup window.
-
This is the way the user dynamically creates the number and the look of
the tabs they are wanting. The user will first need to press the
"New" button, then supply a name, description, and tab color for that
new tab. This can be done to create a maximum of ten tabs. If at any
time, the user wishes to delete a tab, they must first choose the tab name from
the list box, then press delete. To edit or change an attribute about a
tab, the user must first select a tab name from the list box, then make the
changes in the entry field that applies to the change. Beside the Tabs
list box, there is an Up arrow and a Down arrow. To use these arrows,
first make a selection in the Tabs list box, then press the Up arrow if you want
that tab to be moved closer to the default tab, or the Down arrow if you want
that tab to be moved away from the default tab. For any of the above
changes to take place, the user must press "Apply" or
"OK". If "Cancel" is pressed, none of the creations,
deletions, or changes will take place.
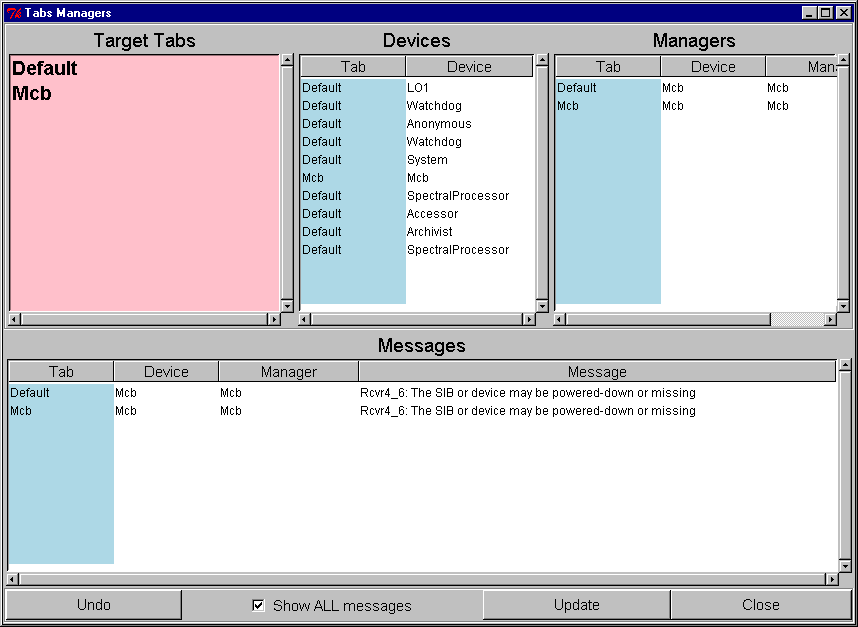
Tabs Manager:
The Tabs Manager button brings up a popup containing four list boxes:
-
The first list box contains the names of all of the tabs in the notebook.
The font is a little larger in this field for drag and drop procedures.
- The second list box has two fields. If a message is being placed in a tab
due to its device name, the tab name and the device name are displayed in this
box.
-
The third list box has three fields. If a message is being placed in a tab
due to its manager name, the tab name, the device name, and the manager name are
displayed in this box.
-
The fourth list box has four fields. If a message is being placed in a tab
due to the message itself, the tab name, the device name, the manager name, and
the message are displayed in this box.
The Tabs Manager has four other buttons of some interest:
-
Undo/Redo:
-
- Undo/Redo will change the application back to its state one step prior to its
last change. The one exception to this is a deletion of a tab. Once
a tab has been deleted, it cannot be brought back.
-
-
Show All Messages:
-
- Show All Messages, when checked, will display all messages that are assigned to
a specific tab, including those on the default tab. When this is not
checked, only those messages that have been specified by the user will be
displayed.
-
-
Update:
-
- Update is basically a refresh button for any changes that have been made but
were not seen by Tabs Manager.
-
-
Close:
-
- Close will discontinue this screen only.
The Tabs Manager is a useful tool in keeping track of what messages, managers,
and devices have been assigned to what tabs. These assignments can be
easily changed by dragging and dropping the message on this popup from one tab
(source tab) to another tab (drop tab). The source tab must be chosen from
one of the list boxes containing a blue column (boxes 2-4), and the drop tab
must be chosen from the pink list box (box 1). An attempt to move messages
in any other way on this popup will result in an error message. To sort
the columns, just click on the label of the column you want to sort on.
The first click will be an increasing and the second will be a decreasing sort.
Remove Cleared:
Remove Cleared removes all messages that have been cleared but are still being
displayed. This would include all transients, sysUps, and sysDowns. -
Refresh:
-
The Refresh button will retrieve all messages from the database and display them
on their appropriate tab. Before this takes place, an error message will
ask the user if they really want to refresh all of the tabs. If the answer
is yes, this may take some time.
-
Quit:
-
The Quit button will close the entire application and program.
-
Tab Tool Bar

This row of buttons contains
the features that apply to a particular tab only. For example, the Filters
and the Level being sorted by can be different for each tab.
Configure Filters:
-
The Configure Filters button brings up a popup that allows the user to specify
what messages they do not want to see displayed on the screen. The user
can filter out four different categories. These are Levels, Devices,
Hosts, and Assert Times. The buttons located directly above the Configure
button turn these filters on or off respectively.
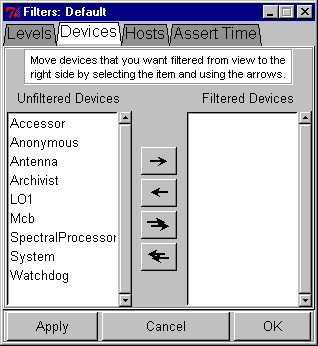 |
- Levels
will filter out any message being received that is of the level you have
specified. If checked, that level will be left out of the display, if not
checked it will be displayed. The "Set all" and "Clear
all" buttons are for easier use when wanting to filter out more than you
want to see.
-
Devices, as shown above, will filter out the device names that you have moved
from the Unfiltered side of the table (left) to the filtered side of the table
(right). This move can be accomplished by selecting one at a time and
pressing the arrow going in the respective direction, making a selection as is
done in windows with control left select and shift left select, or by moving all
of the devices to the filtered side and moving back the ones you do not want
filtered. The single arrow moves a single selection in the appropriate
direction and the double arrow moves all devices in the appropriate direction.
- Hosts works the same way as Devices, only it's for Hosts.
|
-
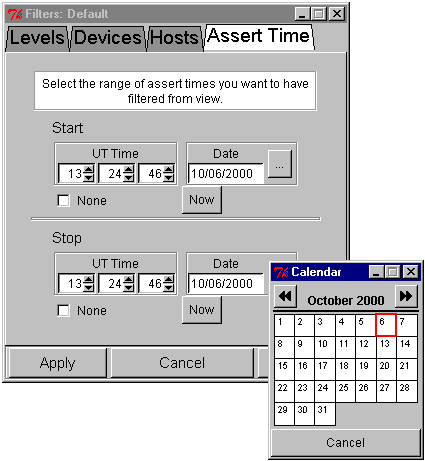
Assert Time is the time that a message is actually received by Monitor &
Control. This window is used for setting a particular time range that you
do not wish to see. One that you wish to have filtered from view. The
Assert Time window has two sections, the Start time and the Stop time. The
Start time is where you enter the beginning time for the filter and the Stop
time is where you enter the ending time for the filter. When this window
comes up, it is in its default setting of "None", which means no
filtered times. To make any changes you must first turn the checkbox
beside the word "None" off. To change the Start Time, which is
in UT Time, use the arrows on the screen to scroll to the appropriate
time. To set the date, click on the button beside the date entry that has
"..." on it. This will bring up a small calendar. The
months on the calendar can be changed by pressing the arrows by the month at the
top, then click on the day you wish to set the filter to. If you want the
filter to start now, instead of going through all of that to get the settings,
just press now and the time and date will be inserted for you. These
changes are the same for Start and Stop. Again, for any of these changes
to take place, you must press OK or Apply, and you must turn on the filter.
|
 |
Turning on/off filters:
To
turn on and off the filters, there is a row of buttons just above the Configure
filters. When the filter is turned on, it will be depressed and yellow in
color.
Auto Scroll:
The Auto Scroll button moves the view of the screen to where the newest message
was placed. Again, this can be turned on or off by pressing the checkbox.
New
Message:
-
The button beside the "New Message" label lets the user choose where
they want a new message to be placed. This button works with the Auto
Scroll button.
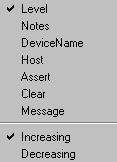
Sorted by:
-
Sorted by tells you what column the tab is being sorted by and in what
direction, increasing or decreasing. It also gives the user another
opportunity to change these values if needed.
-
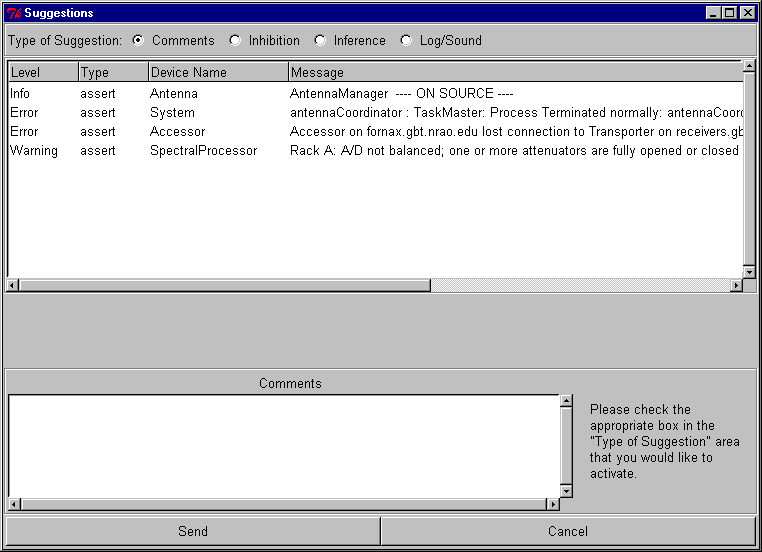
Suggestions:
To be able to bring up the suggestion window, you must first make a selection
from the original display. The selection can be as small as one or as
large as all. Once you have made the selection, you can press the
suggestion button.
-
Types of Suggestions:
-
Comments are for when you just want to send a comment regarding the selected
messages.
-
Inhibition is used when a particular message comes in so you do not display, you
hide, a list of other messages.
-
Inference is used when a group of messages come in and you do not want to see
them all. You just want to see a certain message.
-
Log/Sound is used for keeping track, logging, certain messages and for making
suggestions of sounds for certain messages or groups of messages.
The window starting with the label "Level", displays all of the messages
that you have selected in the original display screen. The comment area is just for writing any comments you may have, or that you want
someone to know about. Beside the comment section is a message box that gives some direction as to what
you have selected and what you should do. Send is what you press to send your "Suggestions" to the appropriate
person via e-mail, so that a specified person can review the possible changes
and prioritize them as well as approve them.
Defining Inhibition and Inference:
The Suggestion window will be a useful tool in communication between the users,
the programmers, and the people keeping track of the database. To give a
better explanation of Inhibition and Inference I am going to use some examples.
Inhibition is like when you get a message that the power source has been
unplugged, but it hasn't been shut down
properly. You get 5 error messages saying that the power source is down
and receivers 1, 2, 3, and 4 aren't working due to a lack of power. Instead of all of these
messages, why not just display the actual cause, that the power source is down,
and get rid of the ones saying that the receivers aren't working. The other
messages could be inhibited by receiving that one message about the power
source.
Inference is when you make clear cut assumptions and conclusions about certain
messages. This would be like the reverse of Inhibition. If you find
that receivers 1, 2, 3, and 4 are not working due to a lack of power, you may
want to just display that the power source is down. Inference is like
giving a possible cause for a certain set of messages.
|


