 Synopsis for Creating lost time information.
Lost observing time is tracked only for Astronomical observations that are formally approved and scheduled. It does not track time lost during tests, calibration or commissioning.
Synopsis for Creating lost time information.This is basically a three step process.
Create a Failure log entry which is marked as Lost Time tracking and the Failure Type set appropriately. Details for accomplishing this task are outline under Failure Entry Type.
Filling in the amount of lost time (see Filling the Amount of Lost Time)
Close the Failure log entry which describes the cause of the lost time (see Closing a Lost Time tracking log entry).
The reason for such a complication is to allow for tracking lost time against a single 'cause' that may remain open for days, weeks or longer. Most of our requirements fall into the category of single 'causes' which last during part of one shift. In such a case there is a slightly simplified procedure as described below under Single lost time failure for current shift only.
Clicking the Lost Time tab with the mouse brings up the screen.
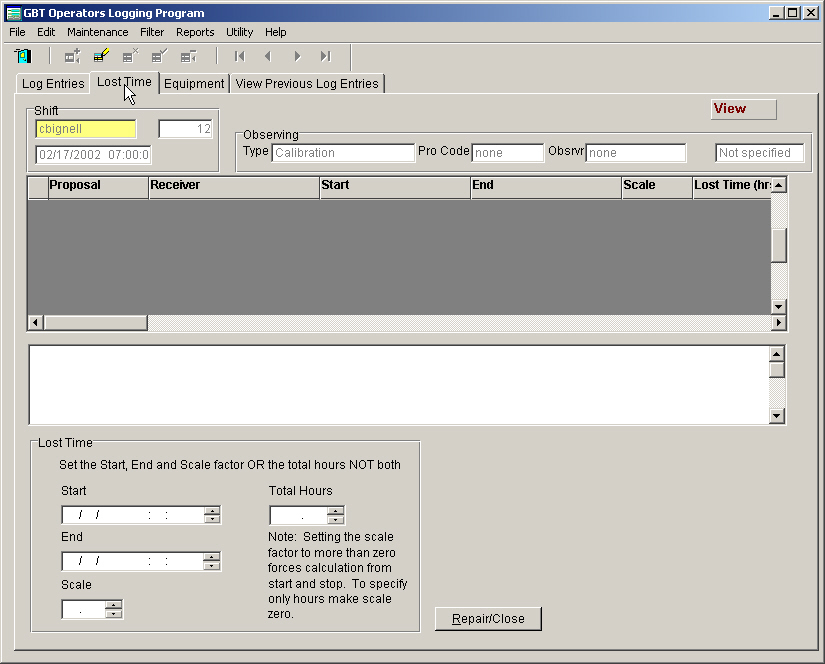
If there any lost time requirements for the current shift they will be listed in the browse window. Each line represents a record for each proposal - receiver combination for each Failure Log Entry marked as Lost Time tracking and still open.
The text window below the browse displays the comment from the original lost time tracking Failure log entry that is still open.
The operator is required to fill in the total number of hours lost during their shift for each of the records in the browse window. To set the total hours point to the appropriate record in the browse window and select Edit current data from the Menu or pop up menu (rick mouse click) or from the tool bar.
Lost time entry appropriate for the current shift may be entered in one of two ways:
Specifying both the start date and time for the period during the shift along with a fraction (Scale) of the time during this time period OR
by entering the total lost hours during the shift applicable to the lost time record.
The simplest and most straight forward is the use the latter method.
If there will be no more lost time charged to the original lost time tracking failure select one of the lost time records from the browse and click the Repair/Close button.
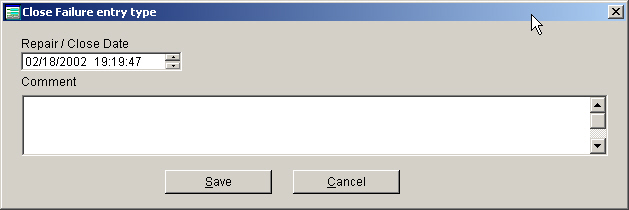
Fill in the fields:
Repair/Close date this is the date and time after which this log entry can no longer accumulate lost time.
Comment Any appropriate comments to putting the piece of hardware back into service or the reason for returning to operations should be entered.
More information on closing a Failure entry is outlined under Restore to operation.
Single Lost time Failure
for current shift onlyMany times the only need for tracking lost time will be an isolated incident (stow due to high winds or snow) during a shift. In this particular case the basic steps are outlined as follows:
When the log entry is being initiated after the 'event' is over (for example after returning to operation).
Create the Failure entry as outlined above entering the time for the failure when the event started (ie stowing due to high winds)
Fill in the Close Entry screen at the end of the process of creating the Failure entry, setting the Close date to the time that the antenna was returned to service OR
When the log entry is being initiated before the 'event' is over
Create the Failure entry as outlined above entering the time for the failure when the event started (ie stowing due to high winds)
Cancel the Close Entry screen that pops up at the end of the creating process
When the 'event' is over (for example returning to operations after being stowed) then Close the Failure by following the procedure outlined under Restore to operation. Make sure that the Repair/Close time is set to the time that operations was restored.
 Whenever one of the above
two procedures is followed correctly and the Failure is closed with the
proper date/times (without logging out and back in during the process)
any lost time records that are created will have the correct lost time
entered automatically and there should not be any need to edit the lost
time record under the Lost Time
tab.
Whenever one of the above
two procedures is followed correctly and the Failure is closed with the
proper date/times (without logging out and back in during the process)
any lost time records that are created will have the correct lost time
entered automatically and there should not be any need to edit the lost
time record under the Lost Time
tab.