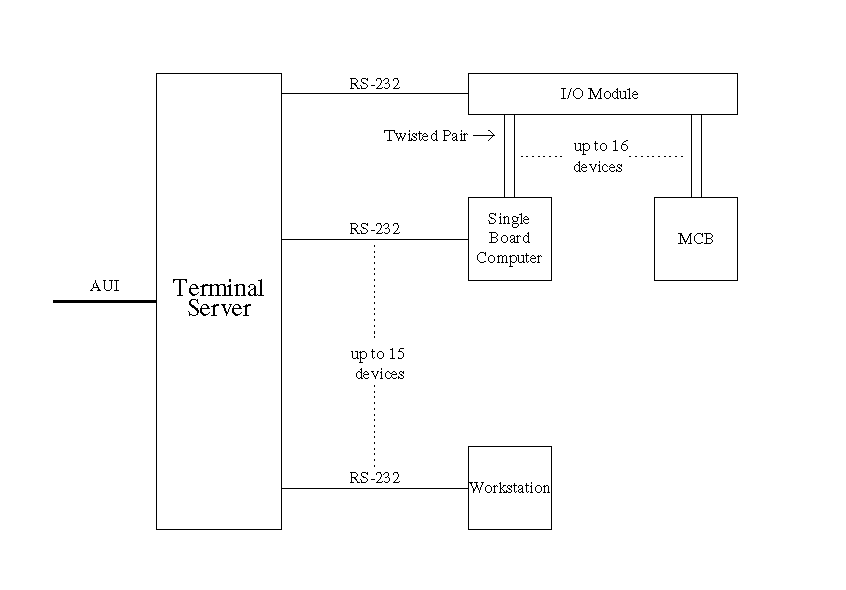

I. Functional Description
The purpose of the GBT SCRB is to allow remote access the single board computers and workstations in the GBT and also to provide the ability to remotely "hard" reset the single board computers and MCBs selectively. Both of these functions are performed over the local area network.
The SCRB is composed of two major devices. The first is
a 16 port terminal server which enables users to telnet into the single
board computers or any other device attached to one of the RS-232 serial
ports. The terminal server is connected to the network by an AUI connector.
The second device is a serial I/O module that controls up to 16 Form C
relays. This I/O module is connected to one of the serial ports on the
terminal server so that the user can control the reset function via the
network.
I.3 Description of Schematics and Mechanical Drawings
A description of schematics for the IOLAN-16 terminal server is
available here.
Refer to the following table for drawings associated with the assembly
and wiring of the SCRB units.
| Project/Title | Drawing Number | Sheet # |
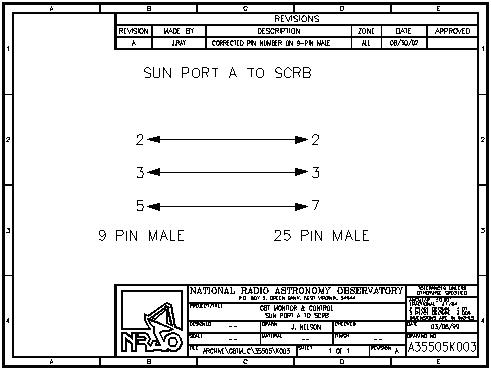
| GBT Monitor & Control Sun Port A to SCRB | A35505K003 | |
| GBT Monitor & Control SCRB to UPS | A35505K004 | |
| GBT Monitor & Control Remote Reset Inter Connections | B35505K001 | |
| GBT M&C Remote Reset SCRB To SBC Cable | A35505K002 | |
| GBT M&C Remote Reset SCRB, Assembly | D35505M001 | sheet 1 |
| GBT M&C Remote Reset SCRB, Front Panel & Plate | D35505M001 | sheet 2 |
| GBT M&C Remote Reset SCRB, Top Cover and Bottom Plate | D35505M001 | sheet 3 |
| GBT M&C Remote Reset SCRB, Left and Right Side Plates | D35505M001 | sheet 4 |
| GBT M&C Remote Reset SCRB, Back Plate | D35505M001 | sheet 5 |
| GBT M&C Remote Reset SCRB, Silkscreen | C35505Q001 |
I.4 Vendor Specifications and
Data Sheets
Chase Research IOLAN-16 Terminal
Server
R.E. Smith
USN1616L
II. Operational Manual
If a new SCRB is to be added to the system, or if an existing
one has failed and no longer responds, then the box can be setup quickly
using
saved configurations contained within an initialization file.
If, for some unknown reason (such as nuclear disaster or alien invasion),
all
SCRB's have crashed and the saved configuration file is corrupted or cannot
be retrieved, please refer to the starting from square
one section for setup procedure.
II.1.A Using Saved Configurations
Saving Server Configuration
Should the configuration of your Server ever be corrupted because of user error or damage, it is an advantage to have the configuration stored somewhere for easy reinstallation. This can be achieved by uploading the configuration of the Server to a host on the network running a TFTP daemon (the init file should be saved in the TFTP directory). This step should already have been completed and a configuration should be saved in the correct location. But in case one is not, or to check and make sure one is, follow this procedure.
Telnet to a working SCRB (see the beginning of Remote Port Setup for this procedure). After typing in the login password, a prompt with the terminal servers name should appear. At the prompt type:
set term <terminal type>
The Chase IOLAN terminal supports the following terminal types: ansi, dumb, vt100, wyse50, wyse60, tvi925, ibm3151, vt320, falco, HP700.
If the Connections Menu does not appear at this point, type set mmi or set menu. From the Connections Menu press ENTER and select "Admin mode" from the Commands Pop-Up Window. From the Administration Menu, select the password field, press ENTER, and proceed to type in the administration password (factory default is "iolan"). Next, select the server field and press ENTER to go to the Server Configuration Menu. The path to and name of the initialization file where the server configuration will be saved, should appear in the "Init file" field and the IP address of the host machine where this file is located should appear in the "Boot host" field. This file is currently located on vega (IP address 172.23.1.3) with the path and name set to /rbconf/iolan. With these parameters set, the configuration of that server can now be saved.
Exit this menu by pressing the Escape key or, if fields were altered, press ENTER then select "Save and Exit". Exit the next menu by pressing Escape again or by selecting "quit". You should now be back at the Connections Menu. From here, press ENTER and select "CLI"(Commond Line Interface) from the Commands Pop-Up Window. The server's prompt should now appear again. Because the configuration can only be saved by the administrator, enter this mode by typing su and pressing ENTER. Again you must enter the administration password ("iolan" by factory default), then save the configuration to the initialization file by typing save config and pressing ENTER.
The Terminal Server port configurations
are now uploaded to the host in a format that will be downloaded on reboot.
Note that this does not save any of the settings configured in the Server
menu including the IP address, language, name, subnet mask, etc.
It is also worthwhile remembering that whenever you change a setting on
the Server it will be overwritten the next time the Server is rebooted
unless the new configuration is saved.
If you are downloading configurations to a new SCRB or to one that you just wish to quickly re-configure, then resetting the server is not necessary. Although, if one of the SCRB's is completely unresponsive, then it may be necessary to reset the terminal server before proceeding. Rebooting is simply a power cycle by just turning the SCRB off and back on again or by selecting reboot from them menu options. A reset involves getting inside of the terminal server and pressing a reset button while rebooting, which sets the server back to it's factory defaults. Resetting should only be necessary in very rare cases.
In order to download the saved configuration, the boot host and initialization file in the SCRB to be configured must match that of the one previously saved. Telnet to the SCRB you want to reconfigure (If you have just reset a terminal server to factory defaults, this step should be done locally, through a terminal connected to port 1 of the SCRB). Login as described above and again make your way to the Server Configuration Menu. Set the IP address of the boot host and the path and name of the init file so that they match those that were entered previously when configurations were being saved.
Press ENTER and choose 'Save and Exit'. You can now select the 'reboot' field and press ENTER. If logged on remotely, you will be disconnected while it reboots. If you are using a local connection, you can watch as the server locates its boot file, then downloads it's initialization file. Everything in the SCRB should now be configured (except for the name, identification, and subnet mask which are all under the Server Configuration Menu), and you can log on remotely to check the settings and make finishing touches. The SCRB's name and identification are unique to each SCRB. They could be assigned locally, before reboot, or remotely after the saved configuration has been downloaded. Same goes for the subnet mask, which is typically 255.255.1.1.
II.1.B Starting from Square-One
Name and IP Address Setup
In the case that an SCRB is being setup for the first time and there is no Ethernet connection or the bootp daemon does not yet recognize the SCRB or the init file cannot be retrieved the network, the terminal server must be setup locally. This entails connecting a terminal (VT100 for example), to one of the ports. Ensure that the terminal is set to the following: 9600 baud, 8 data bits, 1 stop bit, software flow control, no parity. Once the terminal is connected properly, the screen should read:
Local login:
Enter a user name (any user name will work). A prompt with the terminal servers name should appear. If the IP address and name have never been set it will be "local>". At the prompt type:
set term <terminal type>
The Chase IOLAN terminal supports the following terminal types: ansi, dumb, vt100, wyse50, wyse60, tvi925, ibm3151, vt320, falco, HP700.
At this point the Connections Menu should appear on the screen. Press the ENTER key. This will take you to the Commands Pop-up Menu. Use the arrow keys to highlight "Admin mode", and press ENTER. This will bring up the Administration Menu. Select the password field and press ENTER. The server will prompt you for a password. The factory preset for this password is "iolan". Enter the password and press ENTER. The Administration Menu will be redisplayed with a few more fields than before. Select the server field and press ENTER. This will take you to the Server Configuration Menu. We are only concerned with two fields in this menu, Name and IP Address. Enter the data into both fields and then press the ENTER key. (It should be noted that the Name and IP Address assigned to the SCRB should match those in the network host computer.) A Commands Pop-up Menu will be displayed. Select "Save and Exit" if the data is correct. Otherwise select "Cancel", and edit the fields.
Gateway Setup
Upon returning to the Administration Menu, select the gateway field and press the ENTER key. In order for the reset box to be easily accessed from a remote location on the network, establish the gateways as follows:
Entry___Destination_________Gateway________Netmask
_1_____192.33.116.0_______172.23.1.1_______class c_
_2_____199.88.192.0_______172.23.1.1________host__
The SCRB is now set up for remote use. The terminal can be disconnected from port 1, and all operations can be performed over the network now. To do this, at any network computer, type:
telnet <name of SCRB> | <IP Address of SCRB>
Depending on which software version the SCRB is running (see Upgrading the Server for more information), a password prompt or a login prompt with the name of the Reset Box will be displayed. Log in and set the terminal type just as you did above on the local terminal. Enter the Administration menu and the enter the password as above. Now in order to telnet to the individual ports of the terminal server, the serial ports have to be setup. Select port and press ENTER. The Port Setup Menu will appear. Move the cursor to the Access field (in the bottom right quadrant of the screen). Change the setting to "Remote". Next, move to the Authentication field. Change this setting to "Initiated". Now move to the Mode field and change this setting to "Telnet". While going through, check to make sure the Local Port field contains the correct port name. Port 1 should be labeled 1, port 2 labeled 2, port 3 labeled 3, etc.. After configuring all of the ports, exit and save the settings. To telnet to a specific port, at any network machine, type:
telnet <Name of SCRB> | <IP Address of SCRB> <Port Name>
For example, to telnet to port 1 of a SCRB that was named rb2, type:
telnet rb2 1
To exit the Connections Menu, press ENTER and select logout or use the shortcut CTRL-D. To return to the telnet> prompt at anytime, press CTRL-].
II.1.C Resetting the Terminal Server
Unfortunately, the task of resetting the Terminal Server to factory defaults has not been made easy by either the server manufacturers or those that designed the SCRB's. If at all possible, use this method only as a last resort! If there is a problem with the server, you should first attempt each of the following: establishing a telnet session with the server; cycling the power; attempting communication through a terminal connected to port one of the SCRB; and of course checking all cable connections.
To reset the Terminal Server, there is a small white button inside the server that must be held down on reboot. Getting to this button involves removing the top of the SCRB (yes... all 36 screws), detaching the terminal server from the bottom of the reset box by removing the four screws that hold it in place, then removing four more screws from the bottom of the Terminal server to gain access to the inside. Underneath port 1, you will see the button. To reset server, reboot it (either by cycling the power or by selecting "reboot" on the Administration Menu) while holding this button in until this menu appears on the screen of a terminal attached to port 1:
1. Reset the password to 'iolan'.
2. Reset the SERVER to factory defaults.
3. Run the hardware diagnostics.
4. Set the product name.
5. Exit this menu and continue startup.
Press 2 to reset all the parameters in the server except the Ethernet address. The server should immediately begin to bootup and request it's IP address from a host over the network. If the SCRB is not connected to the network, then proceed to setup the server locally. If the SCRB is connected and it's information has been entered in a boot file (bootptab) on a host machine running the bootp daemon, then it should be able to retrieve it's own IP address. If there is also a saved configuration file on the host machine running the TFTP daemon, then see Rebooting and Downloading Server Configurations for more information. If you're not sure whether there is a configuration file, or if you wish to make one, see Using Saved Configurations for assistance.
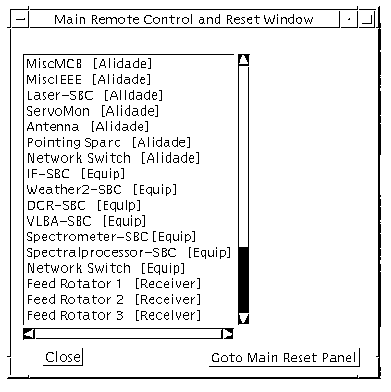
Most user interaction, after the initial setup, will be with the graphical user interface. Once invoked the main window will be displayed (shown below). From the main window there are two primary choices the user can make. If the user double-clicks on a specific device, then a telnet session to that device will be invoked and an option to reset that device will be available. The other choice is to click on the button, "Goto Main Reset Panel". This provides access to all of the reset lines offered, but no option to connect to individual devices. Both of these options are described in more detail below.
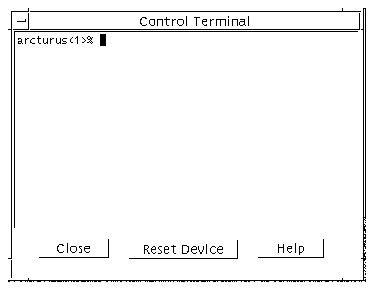
When you select a device from the device list the Control Terminal is displayed (shown below) for that specific device. In the window, a telnet session has been established the specified device. The "Reset Device" button, when selected, sends a reset pulse to the device. The results of a reset can be viewed in the telnet window. Please note that some devices, such as MCB's, will not support a telnet session and only the reset function will work.
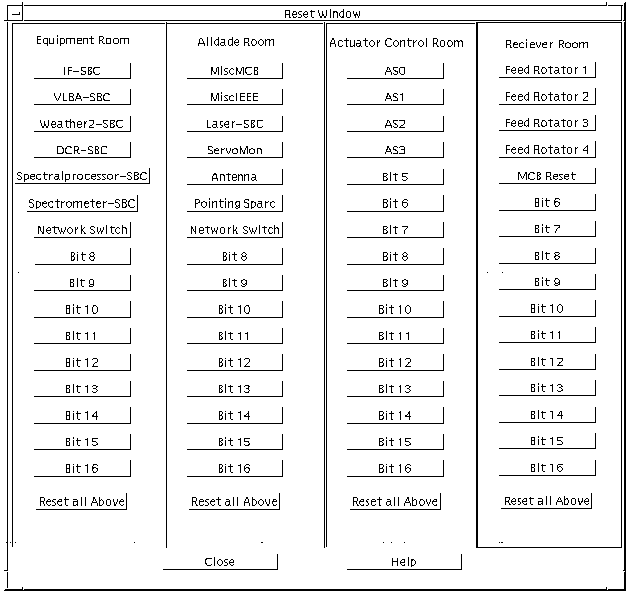
When you select the "Goto Main Reset Panel" the window shown below is displayed. Each of the four columns of buttons corresponds to a room in the telescope where the devices and the SCRB are located. Selecting a button with a device name will reset that device. Selecting the last button in the column labeled "Reset all Above" will reset every device in that room. Reset lines that are not labeled with device names are labeled "Bit __". They are still functional and may be used. It is preferable to prevent confusion by setting up and labeling any reset line that is to be used.
II.3 How to Diagnose Basic Problems.
In general if something is not working, telneting to a device manually (see Remote Port Setup above) is the quickest way to diagnose a basic problem. For instance, if something is wrong with the reset function in a specific room, then try to telnet to port 16 of the terminal server in question. If it connects the terminal server is configured correctly. Then send a wake up call to the USN1616L by typing "L00". If there is no response, then the problem lies in the USN1616L. Otherwise, there is apparently some problem in the software. Below are a few scenarios and possible problems.
If increased speed and reliability of connections to the
terminal server is desired, downloads of more recent versions of the servers
firmware are available at this link -- ftp://ftp.chaser.co.uk/binaries/iolan/dl_firm/old/
Instructions for uploading are available at -- http://212.53.79.198/support/iolan6.htm
III. Bill of Materials
| Item # | Description | Qty. | Cost Each |
| 1 | IOLAN-16 Chase Research IOLAN 16 Port Terminal Server, DB25-Female / Standalone Unit | 1 | $1050.00 |
| 2 | USN1616L R.E. Smith RS485/RS232 Digital I/O Board with 16-opto-isolated inputs, 16-Form-C outputs | 1 | $279.00 |
| 3 | FCC17-E09SM-240 Amphenol RFI Filtered DB-9 Connector | 16 | $10.92 |
| 4 | DB-25 Connector, Plug | 15 | $6.41 |
| 5 | 5EFM1 Corcom M Series RFI Filter Power Entry Module | 1 | $28.18 |
| Total Cost | $1532 | ||
Chase Research, Inc.
545 Marriot Dr., Suite 100
Nashville, TN 37214
Tel: (615)872-0770
Fax: (615)872-0771
R.E. Smith
Serial Communications Products
4311 Tylersville Road
Hamilton, OH 45011
Tel: (513)874-1236
Fax: (513)874-1236
Express Systems
and Peripherals
150 East Commodore Blvd.
Jackson, NJ 08527
Tel: (908)928-3309
Fax: (908)928-1228
R.E. Smith Serial Communications
Products
4311 Tylersville Road
Hamilton, OH 45011
Tel: (513)874-1236
Fax: (513)874-1236