Logging In
Log into naiad as gbtops (get password from Operator).Make sure the Operator has given gbtops@naiad permission to use the devices and move the antenna.
Left screen:
- Ssh as yourself to a computer that is known to the bcpm (eg, vortex or sadira). Start up smaller xterms if desired.
- Ssh from one of the small xterms to bcpm2 as bcpm2 (get password from Operator).
- Choose option "l" to start the normal Unix login.
- "cd dat"
- List "hardware.conf". If you want to add a new 'tape' data area on vortex, follow the next step. Otherwise make sure the "tape" line points to the desired data area.
- If adding a new data directory: Edit "hardware.conf" and scroll to the bottom of the file. Change the "tape" line to read "tape /home/vortex/your_login/bcpm2/scratch 1 1 1" using the bjacoby and istairs lines as guides. You must have a world-writeable directory on the main GB system called /home/vraid2/scratch/your_login/bcpm2/ for this to work. Do not make a subdirectory called "scratch"; "scratch" is used as a temporary filename.
- "cd .."
- Type "ui" to start the User Interface, then hit "return" on "bcpm2" when prompted for a username. The usual BCPM windows will appear.
If you are also running the spigot, you should skip this step!!
On the right screen on NAIAD, start a couple of xterms.
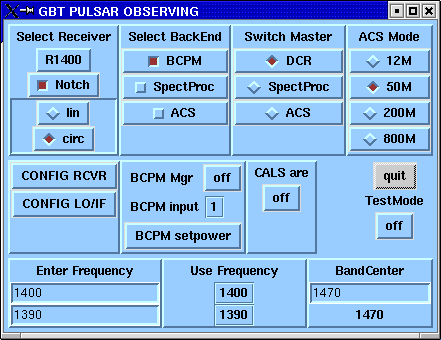
To configure the GBT RF/LO/IF start by selecting the reciever, in the
upper left corner of the GUI. Next configure the receiver by selecting
CONFIG RCVR button, which will take a few seconds to execute.
If you have trouble with the PSRGUI the original setup glish
scripts are documented in the
previous version of this guide.
The BCPM is connected to Converter Modules 4 and 8 (IF 1),
Converter Modules 12 and 16 (IF 2) and 85-3 610 MHz (IF 3).
The PSRGUI program will set up the entire GBT IF chain for the BCPM.
The PSRGUI uses the following equations for setting up the Converter
rack LO2 frequency.
The BCPM input IF center frequency (FBCPM_Center) is 400 MHz,
so the Converter Module LO2 frequency (FLO2)
is set by the following equation:
Different Receivers have different Optical Receiver output center frequencies
(FOptical_Receiver_Center).
For the S band system, the LO1 Sky frequency corresponds to 6000 MHz IF
frequency:
For L band, the LO1 Sky frequency corresponds to 3000 MHz IF frequency:
For Prime Focus 1, the LO1 Sky frequency corresponds to 1080 MHz IF frequency:
A typical sequence is: Monitor scan, cal scan, data scan. Here are procedures for each.
NB not all modes work!! Those in boldface have been known to work (at least with summed polarizations) at some point in the past. Those in red italics are known not to work.
Also note advice on
Using the DLT drives on vortex
Pulsar RF/IF Setup
In one xterm, start up the Pulsar Setup GUI called PSRGUI.
(This glish function is at /opt/local/bin/PSRGUI).
Cleo Windows
On a different desktop on the naiad screen, start the Cleo Launcher.
You will need to launch the following screens:
Unlock each of the screens.
In Device Explorer, double-click on the BCPM device. Then go to the "Managers" menu and select "On". This should start the "init" sequence on the BCPM: lots of info should scroll by in the blue command-line window. If this does not happen, see Troubleshooting.
Check to see that the hybrid/gain settings, LO1 and Converter Rack LO settings are as expected for your observing setup.
If using the PF1 receiver, adjust the attenuators so that the IF powers are about 1.0.
GO
I usually start GO from another xterm on the same desktop where I ran the pulsar setup script.
Type "GO T" and deselect the spectometer before starting the main GUI.
You will probably need the "Observing Table" and "BCPM" panels, both of which can be started from the "Backends, etc." button.
Reminder: Never swipe text that you want to delete from the GO windows!
Type in the full path to your observing table in the "Observing Table" window and hit "Load". The message window at the bottom should say that the table is OK; if not, edit the file for mistakes.
In the BCPM panel, make sure the correct sub-manager is selected (currently only bcpm2 works) and select the desired bandwidth, polarization summing and sample rate. A table converting the mysterious "X2", etc. sample times to microseconds can be found here.
Select observing mode: you must run a scan in Monitor mode with the correct BW, pol summation and sample time before taking any data!
If in Search mode, select:
Timing and Stokes modes do not work yet. Sorry!
Observing
Choose the right IF input!
In the blue command-line window, type "setif 1" for 600/800/Lband,
"setif 2" for 340/450/S-band and "setif 3" for 85-3.
Monitor Scan:
Cal Scan:
Data Scan:
After observing:
Turn off the BCPM Manager in DevExplorer, then quit the BCPM gui.
Miscellaneous
Table of Sample Times in Microseconds
Channel BW (MHz)
x1
x2
x4
x8
1.74
21
42
84
168
1.4
25
50
100
200
1.0
36
72
144
0.7
50
100
200
0.5
72
144
0.35
72
144
0.25
72
144
Troubleshooting
If Task 9 doesn't stop or restart, or there are continuing Cleo error messages about the BCPM manager, the problem may be a dead process. Try doing "ps" (as monctrl on vortex) looking for bcpm and killing the process. Then go through the Taskmaster process again. If none of this works, call Mark Clark or Amy Shelton!
Suggestions:
Writing backup tapes with the DLT drives on Vortex
For Example:
	cd /home/vraid2/scratch/istairs/bcpm2

	ls S22[78]*.bcpm2 | xargs -n 1 tar cvf /dev/rmt/2hn >
		do.fill.GC_020815_tape19a.out &

	ls S22[78]*.bcpm2 | xargs -n 1 tar cvf /dev/rmt/3hn >
		do.fill.GC_020815_tape19b.out &

	NOTE:  Those last two commands should be on a single
	line each (and 2 DLTs are required in the DLT drives obviously).
Modify the above for your situation.
Comments, inaccuracies and suggestions for improvement to Ingrid Stairs