|


YGOR Fundamentals
Menu Bar
State/Status Frame
Lock/Unlock Frame
Parameters
Samplers
Error Traps
|
|
Most applications in CLEO have a menu bar across the top of their main
window. (You might come across an application 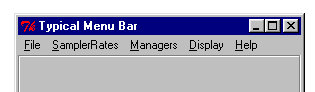 or
two for which a menu bar isn't appropriate and thus doesn't have one.) Some
applications create other windows that might also have their own menu bars. To
give you a feel of familiarity, we tended to use the same items on all the
application's menu bar. Here's what a typical menu bar might look like: or
two for which a menu bar isn't appropriate and thus doesn't have one.) Some
applications create other windows that might also have their own menu bars. To
give you a feel of familiarity, we tended to use the same items on all the
application's menu bar. Here's what a typical menu bar might look like:
The following documents what powers lie behind the typical CLEO menu bar.
Conventions:
To help you understand and use menu bar items, we've adopted a convention
similar to what you'll find in Win9x applications. Here's a fictitious menu that
will illustrate the points we want to make: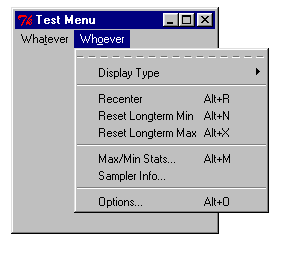
- All items on a menu bar are cascading menus themselves. Clicking on an
item with the mouse (e.g., Whoever in the example) will bring up
other menu choices.
- Menus might also have other cascading menus under them. These are
indicated by right arrows (as in Display Type in the example).
- Most menu bar items will allow you to select them with the keyboard. You
select the item by holding down the Alt key and the underlined letter in the
menu item. For example, if the menu item is Whoever, you can hold
down the Alt key and press o and the cascading menu will appear just as if
you had clicked on the Whoever menu item.
- If a cascading menu is open, you can use the up and down arrow keys to
select an item and a carriage return to execute the selected item. The left
and right arrow keys let you move into and out of cascading menus.
- Some menu items have accelerators to the right of the menu label (e.g., Alt+R
for Recenter in our example). This indicates you need not bring up
the menu to execute the item, but simply hit the appropriate keystrokes.
- Some menu items bring up other windows or applications. You can
distinguish these items because they will have ellipsis (e.g., Options...).
- When appropriate, some menus are 'tearoffs' which allow you to tear the
menu off of the application and place it wherever you like. This is handy if
you use the menu often. You can tell if a menu is a tearoff by the dashed
line at the top of the menu.
File Menu:
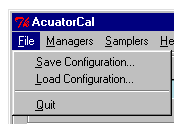 Most
applications will have a File cascading menu bar item. Under File,
you'll almost always find a Quit or Close menu choice. If it's Quit,
you will terminate the current application. If it's Close, then the
window is a child window of an application. Picking Close will only close
the current window and will not kill the application. Most
applications will have a File cascading menu bar item. Under File,
you'll almost always find a Quit or Close menu choice. If it's Quit,
you will terminate the current application. If it's Close, then the
window is a child window of an application. Picking Close will only close
the current window and will not kill the application.
If the application is connected to an YGOR
manager, most often you will find under File a menu choice to Save
Configuration... and another to Load Configuration... If you choose Save,
a file selection window will appear that will allow you to save the current
values of the primary parameters for
the YGOR manager to a file. Load will bring up a file
selection window that will allow you to load the values of the manager's primary
parameters from a configuration file you have previously saved. This is a good
way to save and return to your favorite set of parameter values. Don't worry...
we try to do a lot of error checking to make sure the file you try to load is
appropriate for the desired device. NOTE: For security reasons, you won't be
able to Load a file for a device if you haven't been granted permission
by the operator through the Gateway
database.
Manager Menu:
If the application is connected to an YGOR
manager, the application will probably have a Manager cascading menu
bar item. The Manager menu (always a tearoff menu) allows one to perform
some basic functions with a manger. The following probably won't make sense to
you unless you understand the YGOR
fundamentals documentation and concepts like managers,
parameters, synchronous
and asynchronous managers. Note
that some applications actually connect to more than one manager in which case
the Manager menu will have two or more cascading menus, one for each of
the devices. The cascading menus will be identical to that illustrated below.
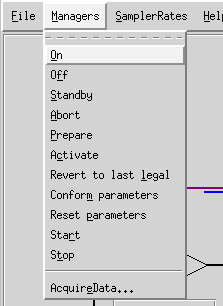
- On - Places the manager into the Ready state from Off
or Standby.
- Off - Places the manager into the Off state from Ready
or Standby.
- Standby - Places the manager into the Standby state from Off
or Ready.
- Abort - Initiates the manager to return to the Ready state
from Activating, Committed, Running, or Stopping
via Aborting; i.e., a software emergency termination of an
observation.
- Prepare - Recomputes all manager values and places the manager into
the Activating state from Ready. After activation is complete,
the manager returns to Ready.
- Activate - Places the manager into the Activating state from
Ready. After activation is complete, the manager returns to Ready.
Not available for most managers.
- Revert to last legal - Returns all manager parameter values to that
of the last successful activate.
- Conform parameters - Causes the manager to recompute all
parameters.
- Reset Parameters - Causes the manager to unconditionally call all
of its parameters' activate method (i.e., reload the hardware from the
software).
- Start - Places the manager into the Activating state from Ready.
If the manager is non-synchronous, it returns to Ready otherwise it proceeds
to the Committed and Running states as soon as possible. Not
available for asynchronous managers.
- Stop - Initiates the manager to return to the Ready state
from Activating, Committed, Running via Stopping;
i.e., a normal termination of an observation. Not available for asynchronous
managers.
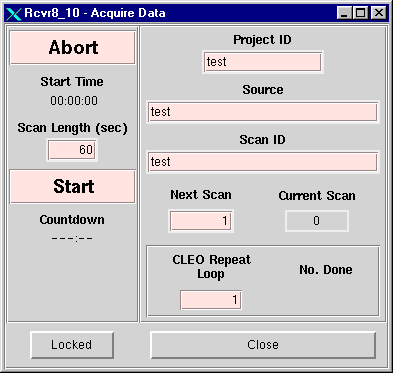 The last item, Acquire Data.., is only available for synchronous
managers. It brings up a window (shown at left) that will allow you to start an
observation with the manager without having to go through the Scan
Coordinator. See the Acquire
Data documentation for details.
The last item, Acquire Data.., is only available for synchronous
managers. It brings up a window (shown at left) that will allow you to start an
observation with the manager without having to go through the Scan
Coordinator. See the Acquire
Data documentation for details.
All of the functions on the Manager menu and in the AcquireData
window will not work for you if you are not in the Gateway
database as having privileges for that device.
SamplerRates Menu:
If the application is connected to an YGOR
manager, and that manager has one or more samplers,
the 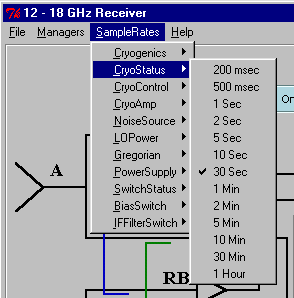 application
will probably have a SamplerRates cascading menu bar item. The menu
allows one to change the rate at which data are sampled. Note that some
applications actually connect to more than one manager or some managers can have
different samplers working at different rates. In these cases the SamplerRates
menu will have two or more cascading menus, one for each of the
devices/samplers. application
will probably have a SamplerRates cascading menu bar item. The menu
allows one to change the rate at which data are sampled. Note that some
applications actually connect to more than one manager or some managers can have
different samplers working at different rates. In these cases the SamplerRates
menu will have two or more cascading menus, one for each of the
devices/samplers.
All of the functions on the SampleRates menu will not work for you if
you are not in the Gateway database as
having privileges for that device.
Display menu:
You'll find a Display cascading menu bar item for applications that
allows you to start other applications (e.g., the Status
and CLEO Launcher applications) or that
generate a good number of 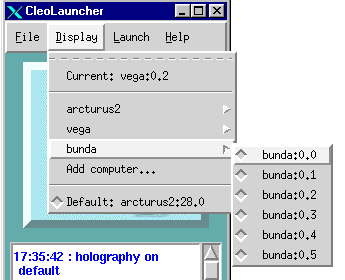 screens
(e.g., the Antenna application).
It is only useful for those who are sitting in front of multiple CRTs on one or
more computers. The menu basically allows you to specify the CRT (and/or the
computer) where the application will next generate a screen. screens
(e.g., the Antenna application).
It is only useful for those who are sitting in front of multiple CRTs on one or
more computers. The menu basically allows you to specify the CRT (and/or the
computer) where the application will next generate a screen.
If you choose Default, the display for the next screen or application
will be on the current application's CRT. In the example to the left, we are
running the CLEO Launcher with the default display of arcturus2:28.0.
You can add displays for other computers by picking the Add computer...
menu item. In the example, the computers vega and bunda were added to the list.
Once you have the computer you want in the list you can choose a display on that
computer. In the example, the first line of the menu tells us the user
previously chose the display vega:0.2 and is about to choose the display bunda:0.0.
When you next launch another CLEO application it should appear on the designated
CRT.
Unfortunately, there's no good way to tell how many displays a computer has
so CLEO assumes a computer can have a maximum of five. Nor can CLEO tell if you
have permission to send a display to a computer. If you specify a display that
doesn't exist or for which you don't have permissions, the screen or application
you try to launch will fail.
Help Menu:
The Help cascading menu bar item is found on virtually all
applications and even on some of the subscreens an application generates. The Help
menu almost always looks like the example. 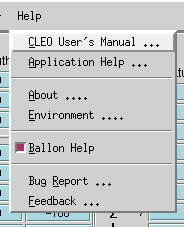
- CLEO User's Manual ... brings up a web browser with this
documentation.
- Application Help ... brings up a web browser with documentation
about the application you are currently using.
- About... brings up a window with the application's version
information as well as the software license agreement.
- Environment... provides you with complete information about your
UNIX environmental variables, current directory, and so forth.
- The Balloon Help check button allows you to turn on or off an
application's balloon popup help messages.
- Bug Report... brings up a web browser and allows you to report a
bug using the GNATS bug reporting facility.
- Feedback... brings up a web browser and allows you to enter your
comments or suggestions concerning any CLEO issue.
|


